Pages

Monday, June 18, 2012

Odds and Ends


Lots of pictures this post!
This week I received the electric exhaust dump I ordered from Quick Time Performance.  It's a valve in your exhaust that can be opened and closed by holding a switch one way or another. You can do a partial open or close if you wish too.  I'm thinking of plumbing the dump output back into the exhaust system after the muffler to help keep the exhaust out of the car. This car is from 1967 and is less than air tight.
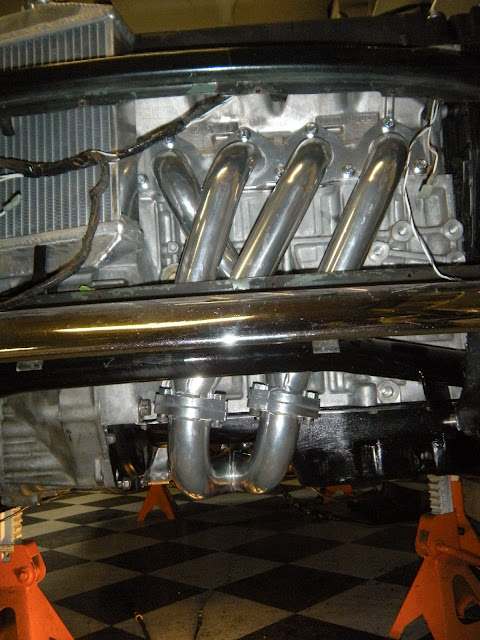
 Also, I installed the rest of the header and I must say it looks cool from under the car, and I put one of the axles in place to make sure it fits.  Lastly, I made some new hydrolastic lines up front with some cleaner angles than stock and then installed two needle valves out back to control how much the suspension moves. 


This is the electric valve I bought for the exhaust.

One axle is in (without boots) and it fits perfect.

Another shot.

  I had the splines cut extra long for more play, turns out I don't need it.
One step closer.

Second half of header is in, I held off to avoid damage until now.
Another shot.

Looking under the car from the front.

Here is one new hydrolastic line with a simple "Z" bend.  The last one looked more like a "ZWSM" bend!

One needle valve per side to control fluid flow.  Some guy who used to race a mini with the "wet" suspension told me about this trick.

Just a Bit of Paint

NEW?  CLICK HERE FOR DAY ONE!

Click here for a 3 minute video of the entire build. 


For this week, the only thing done was a bit of painting.  Too many other things going on and the mini has fallen by the wayside as did my self imposed deadline.

Shift linkage done and painted ready for install.

I painted the axles I got back from Dutchman Motorsports.

This is a fuel filter from a Civic, I'll cut off part of the mounting bracket that won't get used.

Monday, June 11, 2012

Radiator and Wiring Harness


The progress made this week was getting the radiator mounted as well as lots of time cutting, tack welding, then putting final welds on the shift linkage.  It was nice to sit in the car and finally run through the gears (I'm missing a picture of that but will update it later today).
 I also started to track down where all the wires go in the wiring harness.  I cross referenced some schematics I found online with what I have and so far things are looking good.  My daughter Mia was a great helper, I would show her a wire starting at the ECU plug and she would trace it all the way to where ever it ended up.  Then she would check off the wire on the schematic.  This project also doubled as a color blindness test with the wires having green with a yellow stripe and such, she passed.  I could have done it faster on my own but it was great to have her working on my project.  Time well spent!

Marking where to cut.

Rough cut

Some shaping and it's good, (I'll put some rubber hose on the sheet metal as a guard).

Wiring harness, fun stuff.

Mia checking off the wires that we tracked, note the picture of me she drew.

A great helper!

Monday, June 4, 2012

Axles

NEW?  CLICK HERE FOR DAY ONE!

Click here for a 3 minute video of the entire build. 


This week in the garage I messed around with the axles and I was able to finally make a complete set out of all the components I scavenged over the last month.  The last piece I had to find was an inner CV joint that fit my specific half shaft, blah, blah, blah.  Anyway, I now have all the parts to make those round rubber things that roll on the road actually move.

Hub in place without CV installed in it and the Honda axle going through it, yup it's a bit long.

After marking the length, I did a little measuring and some math to find out just how much the Honda shaft needs to cut down.
Here is the Honda shaft mostly stripped and ready to be shipped to Dutchman Axles in Portland, Or. for the cut and new splines.