Pages

Monday, November 26, 2012

Ready to run (in theory).


I just torqued the last bolt as the sun went down and dinner was ready.   Test drive will need to hold off a few hours more.

Sitting on all 4 wheels after a year on jack stands.
Minis are low!  The car is sitting a little lower than normal though, I need to pump up the suspension a bit more.  I haven't decided if I'll put the front valance back on or not, You pretty much need to be on your knees to see it's missing.
Picture of the car with camera at head height.  Yes it really is that small.

Friday, November 16, 2012

It's ALIVE!


After hooking up the last wire there wasn't much to do other than gas it up and hit the starter to see what happens. The engine started right up instantly! I'm so happy about that, and I love the light weight flywheel.

Next, all that is needed it to stuff all the wires behind the dash, assemble the driver's hub, build some radiator hoses and it's off to the races.  More likely to have exhaust made, get an alignment, then to the dyno.

 
It started up instantly and settled into a smooth idle. 

Wiring has been put away behind the dash, the OBD1 ECU and fuse box are hanging under and will be mounted soon.
Here is some stainless tubing and clamps from my dad's little project.  Thanks!

Lower radiator hose installed.
Another shot.

Monday, November 12, 2012

Electrons, they are a flowing!


Over the weekend I have achieved "power on" so now you can turn the key and hear relays turn on, and the engine cranks over.  What I did was I supplied the power using a battery charger not a battery.  I watched the gauge on the charger then plugged in one fuse at a time and made sure there wasn’t any spikes in power usage.  
The mini side of things are mostly untouched so lights and dash systems still function as they once did.
One problem I have is the fuel pump relay isn't getting a signal from the computer to turn on, I can jump the main relay and the pump turns on but for some reason the computer isn't doing it.  There are several factors the computer uses to control the pump so for now I'll need to do more reading.  The Honda forums have been very helpful.
Next I can fuel up, flush the fuel lines, then put oil in the engine and tranny.  After that I hope the garage gets noisy!  No exhaust system in place yet..
Other things needed are radiator hoses, some assembly of the driver’s side wheel/brake/bearing set up and some odds and ends.  One thing I keep forgetting to do is to plumb up my classic mechanical oil pressure gauge.  This is a must before engine start up, if I forget to do that I’ll have a big mess in the car with the tube pumping engine oil all over.
  .
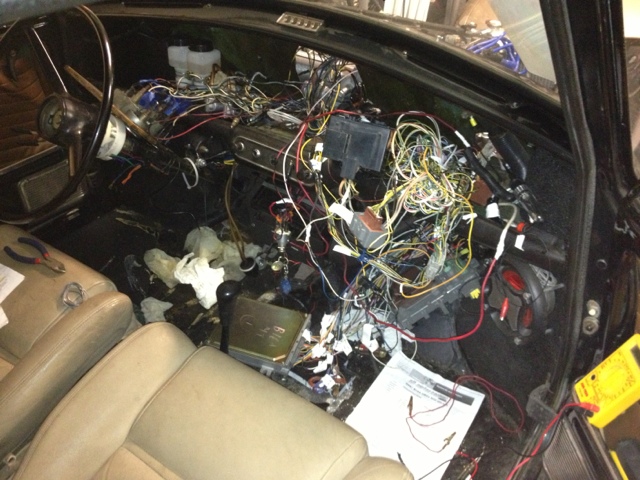
The rat nest is getting closer to being tucked under and in the dash.

Monday, November 5, 2012

Electrons


All this week I only worked on electrical.  I boiled the Honda wires down to about 5 wires that need to interface with the Mini harness, and spent lots of time online as well as testing several circuits to verify what wires need to be connected together.  One problem I had was the diagram I was using had a few relays that don't exist on my harness and that was throwing me off!
Anyway as you can see below, things look the same but progress has been made.  The fuel system is wired up, as well as the starter, and the VTEC solenoid.  What's left to figure out is the "on" circuit to get power to the main Honda fuse panel.  There are some fat wires on the Honda side which make me nervous when the Mini main wire is so small.  BUT, I think the fat Honda wire needs to be big due to things like headlights, defogger, power seats, and a bunch of other items this fuse panel won't power on this car.  I'm adding up the values of the fuses that will be used to figure out what wire gauge is needed.  If a larger wire is needed on the Mini side, then I'll run a relay to deal with the larger power draw.  There is always a way!

I used same picture as before because things look the same!

Monday, October 29, 2012

Electrical started!


I still have a few odds and ends to finish but decided to start the electrical in earnest.  The wiring diagram that Mia helped me work out along with all the labels on wires is a big help.
So far I connected the fan and the starter.  The fan was a slam dunk, the starter however was a bit of a challenge on the Honda side.  There are quite a few wires dealing with the starter, the signal goes through a few switches before the signal hits a pair of relays then off to the solenoid.  Modern cars have safety and anti-theft systems in place that all need to be satisfied before the starter gets any juice.  Things like the clutch must be depressed, the key must be in etc.  Some of those can be used as a theft deterrent in my case.  Most will be eliminated.


The big picture.

I study this for half an hour then solder a wire for two minutes.  Repeat.

Monday, October 22, 2012

Shift linkage re-do


After bolting up the shift linkage and this time tightening down the bolts and squishing the bushings, I discovered the linkage needed a bit more tweaking.  So off it came and I did some more cutting and welding.
I also spent Sunday replacing a ball joint on my other car.  Ugh, I don't like working on a car only to get it back to the condition it was earlier!  Building something new is much more rewarding.


Sunday, September 23, 2012

Starting Electrical


OK, so last week I had nothing!  But things are getting back to somewhat normal around the house and this weekend Brandi helped me install 4 bolts that were impossible to do alone, it was funny to see her crammed in this little car reaching and flexing to help hold the bolt in place,  now she knows why my back hurts from time to time!  I also got the brakes and spacers installed, the spacers are a bit large and I'll either cut them down or buy smaller ones later.  On to electrical!

"Big" brakes, small wheel = the calipers and disk needs to be located inboard of the wheel to fit.  It's a bit hard on bearings but now I have the big roller bearings and larger CV stub shaft so I'm not worried about it.  There are only a few hundred pounds per corner on this 1967 pop can.


Started electrical.


Wires are tucked, the bundle upper left are original mini and will be tucked later.

Now the mess is inside.

Just a fun picture.


Monday, September 10, 2012

Picking off little things.


So for the last few months I couldn't find the special shouldered bolts that attach the center axle bearing housing to the engine, that thing has just been hanging out until now.  I found the bolts while looking for other things, so that is now attached for good.
Also I deemed it time to install the radiator for good, that thing looks nice!  I had pulled it out to protect it until now.
I also secured some of the brake lines to the car a little better, and cut/installed the heater hoses.  There also is this little breather box on the back of the engine that needed a new O-ring, I put that back together too.
I'm installing the shift linkage, that thing was perfect but for some reason, it is hitting things.  I'll have to beat on it a bit.  Another thing I did was to order some bolts that will be used as wheel studs through my brake disk, drive flange and wheel spacer stack up.  Then on go the wheels!

Radiator in for good (I'll put the cardboard back on).  I still may pull it out this winter so I can paint the slam panel.  You can see this picture was shot before I finished putting on the rubber guard.

Here are two heater hoses finally plumbed, I had to buy an adapter to go from one hose size to another.  Ugly clamps are in place but this winter I have plans to put some sort of shrink clamp thing that will be much cleaner.  Now that I'm looking at this photo, I see the old brake line mount (bracket with hole near top center) that should probably go away or???