Pages

Wednesday, January 25, 2012

Patchwork

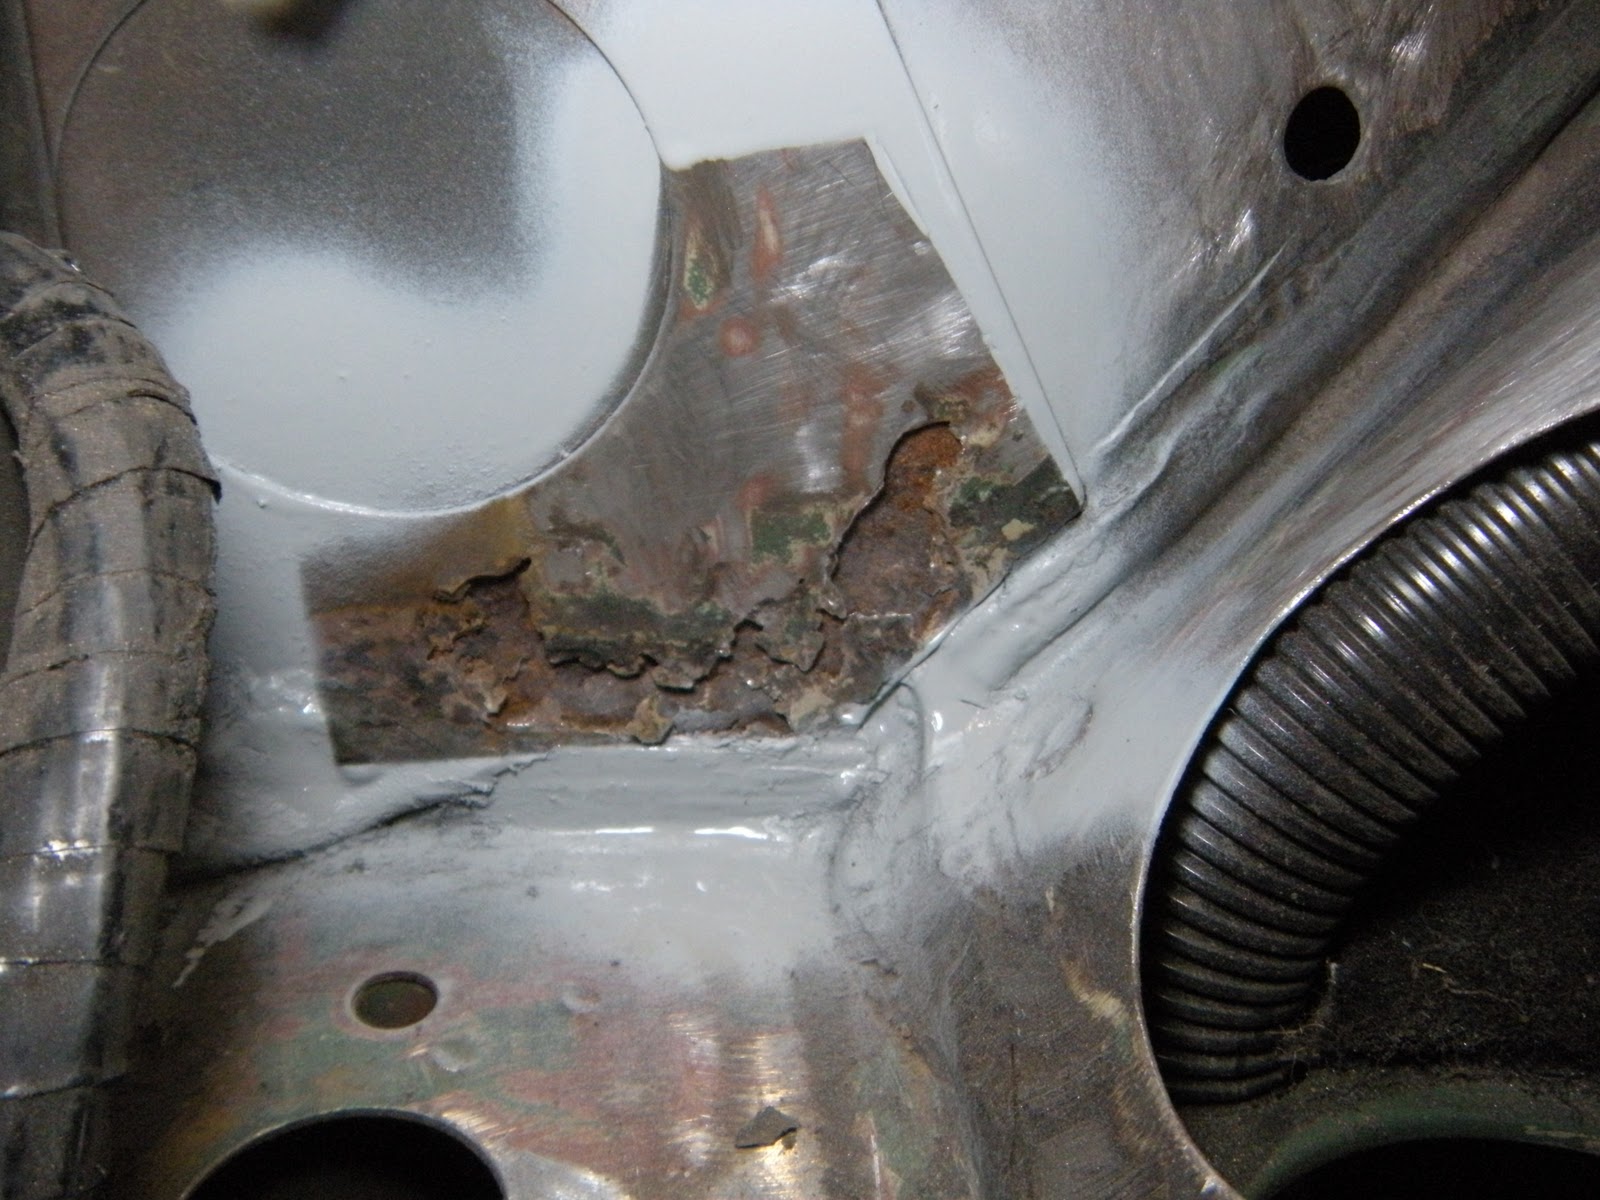
Time for working on the mini has been scarce but I was able to weld in the patches and spray one with undercoating.  Next will be sealing all seams with automotive seam sealer then spraying the entire bottom half of the firewall with the rubberized undercoating and the top half with gloss black.

Patch welded in the inner fender with one layer of undercoating.

Other side of inner fender with patch, the rust was through this doubler and the wall.  Moisture was able to sit between the the two and rust from the inside out.  This could look a bit better however it will all get seam sealed and hidden.  Also, the driver's side was solid due to the hot air exhaust from the radiator blowing right there.  On these classic minis, the radiator is located and  blows through the driver's side fender well and consequently the driver's side tends to stay rust free.

Both left and right floor pans welded up 100% and ready for undercoating.

Monday, January 9, 2012

Tranny Gear Ratios

This week the only work that was done on the Mini was some welding of one of the patches for the floor.  Not done yet, when I get it finished I'll post some pictures. 
I also found out the 67 tooth ring gear means the transmission that came with the JDM B16 has a 4.7 final drive ratio and not the 4.4 as was stated when I purchased it.  Luckily, I contacted the Honda race shop "Speed Factory" here in the area and they had a complete LS gear set in excellent shape as well as a geared LSD and were willing to install that in my case in exchange for my gear set and LSD.  I love it when I can trade with no $$ involved.  So now I will have a 4.266 final drive ring gear that will give me a 3.27 final ratio with the .714 5th gear.  That is as good as it gets for tall gears in a B-16.  Of course I need the tall gears due to the unique 10" rims the old mini is loved for.  So now I should have around 3300 RPM at 60 MPH and about 3900 at 70MPH with my 165/70x10 Yokohama A032R tires.  This also allows 60MPH to be at the top of second gear so only one shift will be needed for a quick 0-60 time.

Tuesday, January 3, 2012

Rust Repair

Next I cut some steal sheet to the proper shapes so I can go about patching the rust spots in the floor panels as well as above the passenger fender skirt.  The previous owner welded a patch on the inside floor but did it OVER the original rusty metal.  I'll cut it all out and weld in a new piece then grind it flush.
I hear the passenger side rusts out faster due to the (stock) radiator hot air exhaust drying the driver side fender out more.  Just a rumor but it runs somewhat true with my car.

Passenger's side floor

Patch

Area to cut

Driver's side floor

Patch

Area to cut


Passenger's side above fender skirt

Patch
Area to cut
Floor ready to cut

Monday, January 2, 2012

Trany Build

On the last day of my Christmas break and spending time with family, I was able to spend a day with the Mini but wasted a few hours trying to put the transmission case on with the reverse idler gear upside down.  After taking parts out of the tranny and trying to put the case on until it mated correctly, I found the conflicting component.  I confirmed this with a wonderful YouTube video HERE.  That video (part three) of a B16 tranny tear down is excellent.

LS fifth gear installed (top gears)


Goo is on

Case is on and the "fun" snap ring about to be replaced

Case back off (several times) but now figured out this reverse idler gear was on upside down, here is is correct

Transmission ready to install

Tranny ready to go with "like new" throw out bearing


Monday, December 19, 2011

LSD

This week I did more sanding and cut out the passenger side inner fender skirt.  I still need to cut a section out of the front valance (temporally) to make room to fit the sub frame.  I also got back my header from Performance Coatings in Auburn, Wa.  Wow that thing looks great. pics to follow.
Also, my dad and I used his press to pop off the two bearings holding the 5th gear on the shaft, swap it for the LS 5th and then press the bearings back on.  Like my dad said last night, "I don't use this press very often but when you need it, it's sure nice to have."  So true and thanks for your help, I wish I got some pictures of that process.  After pulling the counter shaft I pulled the LSD differential assembly to see the other side.  This looks like it's a D2 diff or something.  Doing a bit of research online tells me it's a factory unit but I think it's a geared LSD and not the clutch type.  Not sure.  Anyway here are the pics, I still can't believe my luck buying a JDM engine and finding a freshly gone through tranny, stage 1 clutch and light weight flywheel inside.  Just look how clean the case is.


Wednesday, December 14, 2011

Firewall Prep

Last night I cut out the driver side inner fender skirt.  Not lots of progress but some non the less.  I have been spending lots of time sanding the fire wall though, that's slow going work.  I was thinking last night under the car that I should spray some of that textured goop on the bottom half of the firewall where it's less seen and harder to reach and clean later.


Wednesday, December 7, 2011

Clutch and Flywheel


Yesterday I picked up the two 12 point sockets needed to remove the clutch and flywheel.  After looking at the clutch I saw a little label stamped into it saying "Exedy"  The clutch looks almost new and it turn out to be a stage 1 clutch.  After going online to do a bit of research, I don't think the flywheel is stock either, it's some sort of lightened one (not sure of the brand, no marks).  I weighed it and it's about 14-15lbs vs my 8.8 and I think a stock one is about 18-19lbs.  This could be a type R flywheel, not sure.
I've heard from some other VTEC Mini owners the OEM clutch is more than adequate, due to the mini only weighing in at 1400lbs.  And that racing clutches function more like a switch and require more peddle pressure.  Before I bolt on the tranny I need to make sure I want to keep this clutch.

Clutch pulled off


New ACT 8.8lb flywheel, I'm not sure what the old one is, but I don't think it's stock.

ACT flywheel installed.

Clutch  and flywheel installed.

Tuesday, November 29, 2011

Firewall Cleanup


I finally got the clutch and brake master cylinders out as well as some other things out of the way. I started to remove all the grime with various air tools and settled on a small rough grit sanding disk. I think I'll use some bed liner or sound deadening mats on the firewall to quiet things down as these old minis didn't come with much in that department, I'll also plug the giant hole, not sure why that's there...

Sunday, November 27, 2011

Tranny pull

NEW?  START DAY ONE HERE.

Dave and I pulled the tranny off and cracked it open.  I bought a LS 5th gear set to bring the RPM down on the freeway.  Gonna need that with 10 inch tires!  Thanks Dave for coming down.  Oh, and we found some nice videos on YouTube that helped out.
Dave and I pulled the tranny off the B16 after pulling the bolts and the splash plate.
Look at that clutch,  hardly any dust on it, the thing looks new!
Tranny drained and about to be popped open (fluid looked new too).
Dave and I having steak BBQed (over alder wood chips) while watching YouTube leaning how to crack the case.
Dave wrenching.
Ok, now what?  The 5th gear is on top, so that's nice.
We pulled the bearing off the shaft on the right with ease, the ones on the left need a slim puller.


As I pulled the parts I stacked them in order  (the new LS 5th is on the left).

Monday, November 21, 2011

Master Cylinder

NEW?  CLICK HERE FOR DAY ONE!

OK, almost an hour spent trying to get the brake and master cylinders out of the firewall but they are as firm as I started. Bummer, I'm going to bed.
Bottom bolt out.

Sunday, November 20, 2011

Stripping Hubs


  ---UPDATES ARE ON MONDAYS---
Today I stripped the hubs of all the old parts that aren't needed any more.  Gone are the small CV joints and little ball bearings!  I just found out you can take a larger "S" CV joint and roller bearings and they will fit in the hub if you use an external drive flange and not the internal one like the old drum brake set up.  Much stronger and is needed to handle the extra horse power and torque of the VTEC engine.


Next is to clean these hubs up and possibly give them a new coat of black paint.  There is no need to pop off the arms as I replaced all the joints 5K miles ago.

Tuesday, November 15, 2011

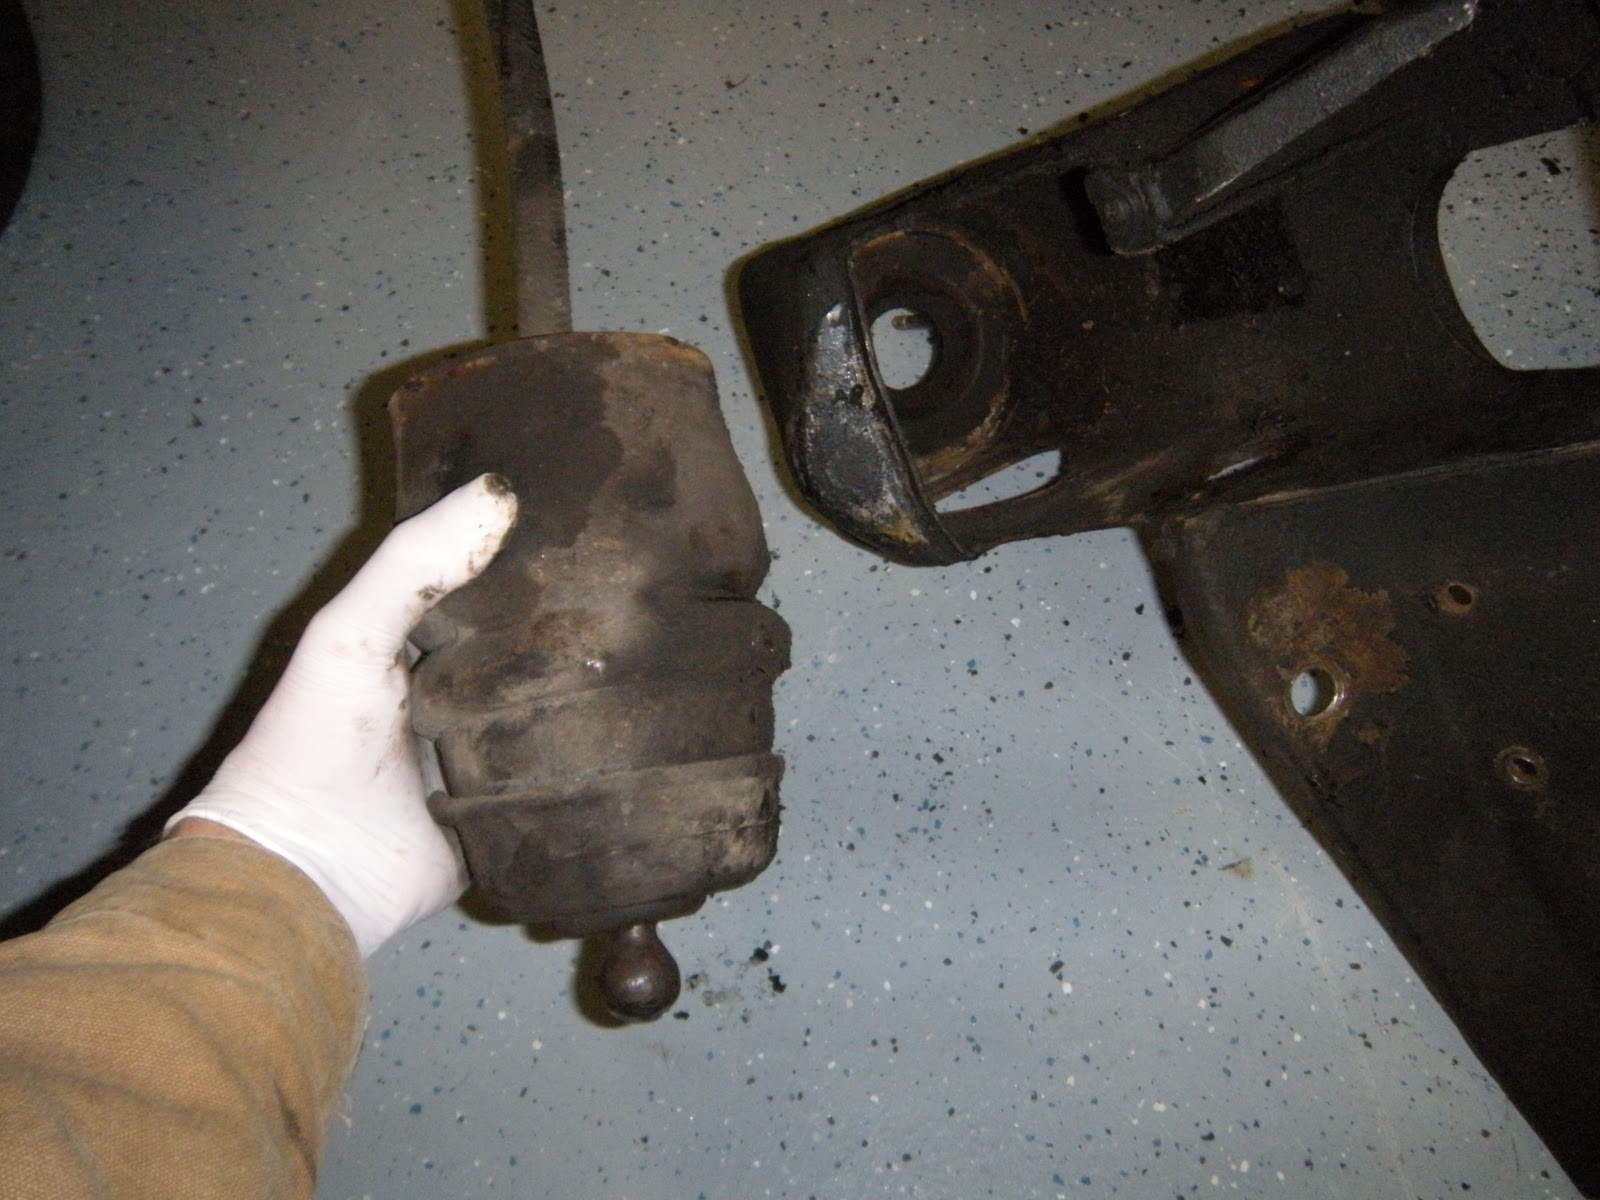
Hydrolastic Displacers

NEW?  START DAY ONE HERE.

Click here for a 3 minute video of the entire build.

                                                    ---UPDATES ARE ON MONDAYS---
I was finally able to remove the front hydro bags (with some advice from a few mini owners) and now I have the old sub-frame completely stripped.   I also found out why the car always pulled to the left, a crumpled sub-frame thanks to some crazy Italian driver pushing the limits a bit too far (I assume).