Pages

Tuesday, May 29, 2012

Wiring Harness, Fuel, Oil

NEW?  CLICK HERE FOR DAY ONE!

Click here for a 3 minute video of the entire build. 


Last week I was a plumber, this week I'm an electrician.  I spent 4 hours at the wrecking yard removing and labeling the under dash wiring harness from a 1994 Honda Civic.  What a mess that was, I think they take the wire harness, send it down the line and build the car around it. The cool part is not having to be careful with the dash and other components.  So now the wiring harness is strung out on the garage floor and the real fun starts.  I spent at least two hours cutting away the wires I don't need.
Meanwhile at the other end of the car... I finished the fuel line that goes into the gas tank, I cut the original small tube off the flange, drilled out the hole, bent a larger steal tube, inserted and welded both tubes back on the flange.  I welded the small tube back on right next to the new one because it holds the fuel level sending unit in place.  I then sealed up the tube where it goes through the flange with J.B. Weld to make sure there are no leaks.
Another thing done is the cutting of the shelf behind the dash (hidden area) to provide clearance for the clutch and brake pedal box assembly which I hope to mount in a day or two.
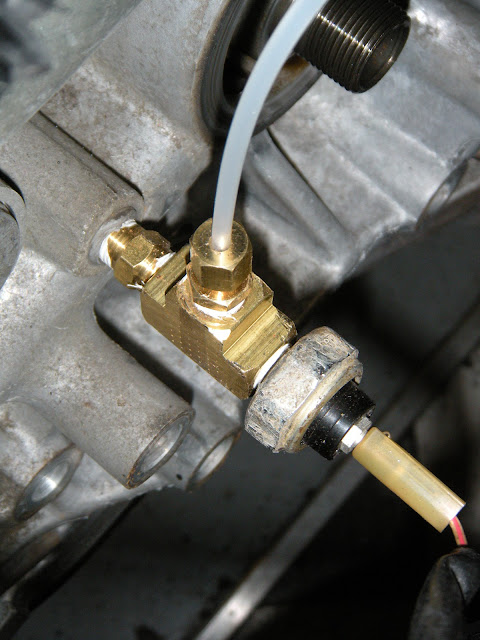
As what is common in old cars, I have a mechanical oil pressure gauge in the dash but the Honda motor has an electric oil pressure sending unit.  I want to keep all my stock classic gauges (which are in excellent shape) so I bought a "T" at the local  Ace Hardware down the street and plumbed that in so now the ECU still receives a signal and I have a  place to plumb in the oil line for the mechanical gauge.  Boom that was easy.
Monday my good friend Dave came over to lend a hand, we were able to do some fine tuning on the position of the engine/frame assembly, thanks for your help Dave!
The weekend flew by and a per the norm I was only able to get half of what I wanted done.  So next is mounting the radiator, pedal box and shift linkage.  Oh, fuel and clutch lines also.  And oh yeah, the rest of the Hydrolastic suspension lines too.  And, and, and...

Wiring harness rat nest.
My pedal box modified and stuffed with Wilwood master cylinders!

Big hole in dash shelf for pedal box.

"T" for oil pressure sending unit and mechanical tap.


Fuel line and sending unit flange (cut).
New 3/8 fuel line welded in with flared end.

Sealed up new fuel line.

Monday, May 21, 2012

Hydrolastic Suspension

NEW?  CLICK HERE FOR DAY ONE!

Click here for a 3 minute video of the entire build. 

Another week under the bridge and some little things have been done.  Like building a house the devil is in the details, the walls go up quick but the little stuff can take forever.  Here I cleaned up some fittings that can't be removed or replaced.  Also, under the car I replaced a damaged section of tube that connects the front hydrolastic displacer unit to the rear.  After things are done I plan on putting a needle valve inline on each side to dial down fluid movement and stiffen up the ride as I wish.  The idea is to minimize rear end squat on acceleration (and front end rise). So yup, I turned into a plumber this week.

Old fitting.

Wire wheel to clean the old fitting.

Fitting rust/grime free.

Soaking the fitting in a zinc phosphate acid solution.  I used a POR 15 product called "Metal Prep" and info on it can be found here.


Zinc phosphate coated fitting all nice and new looking.

Happy birthday to me!  This is a custom radiator designed to fit into the only space left that's not taken up by the engine.

The spuds on this radiator are pointed in the correct position, one of the reasons I bought it.  Most wrecking yard rads will require several mods and end up looking like a mess when done and still not fit perfect.  Installation will be this upcoming weekend.

Monday, May 14, 2012

Axles and Wiring Harness


This week I modified and mounted a bracket, installed the engine wiring harness on the engine, installed the alternator and its brackets, and found out which axles would work out of the bunch I bought.  The correct middle half shaft still needs to be sourced though.


Old brake line support bracket I cut and to be welded in a new location (I'm holding the piece I'll keep, the non-panted piece is the remnants and in the photo for reference). 

New location for brake bracket welded and painted with POR 15.


Engine wiring is done (intake is off).

Alternator mounted in driver's side fender area.

Looking up and forward inside the driver's side fender.

I also started to work on the fuel system, here is the sending unit assembly which I need to weld a larger fuel line through the mounting plate.

Monday, May 7, 2012

Axles


I bought axles.  Boom! Blog post done.

I found some axles from a local guy on craigslist for $40, an assortment of B series axles, a half shaft, and a long D series one as well.  I'll keep two B's and sell the rest.  After cleaning up the axles I can stuff them in the tranny and measure the length to be cut and reslpined on the outer ends to fit my mini CV joints.  Also, the half shaft on the left is the wrong one for what I need, so it will get sold as well.  Oh well, at least I'm a little closer axle wise.